Note: Please read the article carefully before proceeding! If in the process of using you encounter any errors, such as broken download links, slow loading blog, or not being able to access a certain page on the blog … then please inform me through the Contact page. Thanks!
Taking a screenshot of a computer is one of the things that I always have to do when writing a tutorial to blog, these photos will help readers easier to follow and perform. As well as easily understand what you are trying to convey.
In addition, these screenshots also tell you that the tips that I have shared with you have all been successfully implemented on my computer. From there you will be assured that follow more.
I have written tips on many operating systems already: Windows, Android, iOS, macOS, Ubuntu, … and on each of these operating systems, there are different screen capture tools for computers. On the Windows operating system, the Admin and the CTV friends have shared a lot of tools and software that support this.
Read more:
So in this article, you temporarily put aside Windows 10 and Linux operating systems, because in this tutorial, I will share with you basic and advanced tips. to be able to master the tool take screenshots on macOS Please !

I. How to use screen capture tool on macOS
Like the Windows operating system, on MacOS, Apple is also equipped with a screenshot tool that I find very useful. However, this default tool is full of features compared to other operating systems I've used.
It fulfills almost all of your screen capturing requirements, captures each region, captures each window, captures full screen, and can even record screen videos.
Of course, I will not talk about video recording in this article. Anyway, no more words, I'll go straight to the main point.
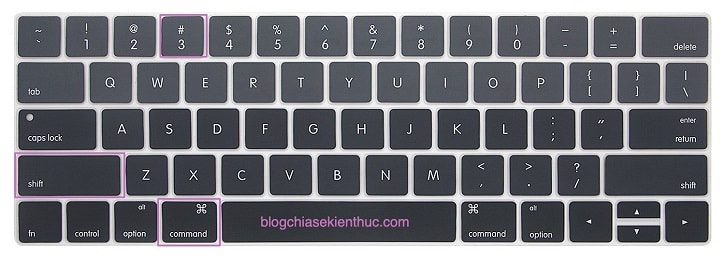
#first. Capture the entire computer screen on a Macbook
This is the most basic function that every computer screen capture tool needs, if on Windows we use it Windows (+FN) + Print Screen (Prnt Scrn) …
… then for macOS, use the combination Command ⌘ + Shift ⇧ + 3 Please !
Fortunately, I do not stick Print Screen key because the mechanical keyboard I use does not have that button 😛
Screenshots will be automatically saved to your main screen, if you have not or want to change this save location, you can see instructions in section # 7 below.
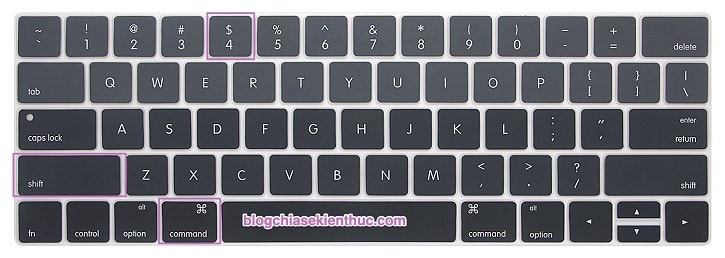
#2. Capture an area of your choice on your computer screen
This is probably the type I use most when writing tutorials, to activate this mode, press the key at the same time. Command ⌘ + Shift ⇧ + 4 on the keyboard of the Macbook.
If you have switched to using a mechanical keyboard, the keyboard does not have the Mac's Layout due to the muscular keyboard of the 2016-2019 MacBook, then press Windows + Shift + 4 dentist.
Your mouse pointer will immediately turn into a seal + with 2 numbers next to it, hold down mouse => and drag the mouse cursor to select the area you want to take the image on the screen.
Now the other two numbers will be the size of the area you have chosen to take, use it to get the image of the desired size.
Photo taken will not save always, to learn how to save, read in the section # 5 to know.

# 3. Single capture the window you selected on the screen
This feature is quite useful when it allows you to quickly capture the entire window rather than taking a full screen and then cut out or use # 2 to select the shooting area.
Perform: You also use the key combination Command (⌘) + Shift (⇧) + 4 But this time, press Space again.
At this point, the mouse pointer will turn into a camera image, and the window below the cursor will light up (the default color is blue) as shown below.
Use the mouse cursor and move it to the window you want to capture and then left click (or right) one shot to capture the entire selected window. If you've used SnagIT before, I said you would understand it here.
Very simple is not it, here are 3 ways to take screenshots that we will use most on macOS, just master these 3 ways, I think you do not need to use external software anymore 😀

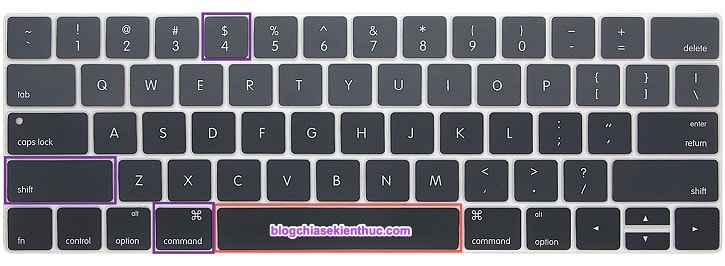
# 4. Take photos and put them on the Clipboard
Surely many of you have the same habit here: Take photos with SnippingTool or Windows + Print Screen => and then press the key combination Ctrl + V to paste it into Word, Messenger .. right?
On macOS, we can do the same thing, except it's a little more complicated.
How to do the following: We will also use one of the 3 photography methods above.
However, don't just click Command (⌘) + Shift (⇧) + 4 good Command (⌘) + Shift (⇧) + 3 no more …
… but you press the extra key Control Another is: Control + Command ⌘ + Shift ⇧ + 3 (4 hoặc 5) and then shoot as usual.
And now that the picture you have taken is already saved in the Clipboard, you can quickly send it to others using the key combination. Command ⌘ + V To Paste (paste) offline!
# 5. Save and edit photos before saving
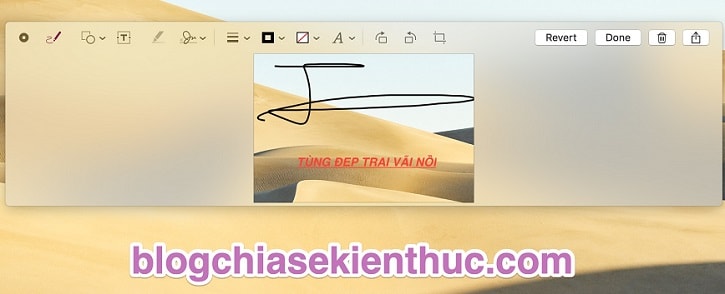
All screenshots after capture will be saved to your main screen, but before saving there will be a Thumbnail of the photo just appeared in the bottom of the screen.
If you click on this small figure before it disappears, you will open the photo editing tool of this screenshot feature.
Here you can adjust some simple things like writing text on the image, drawing arrows on the image, drawing pictures, rotating, cutting things, generally enough to use. There are 3 options for you:
- Click
Revertto cancel the edits just made. - Click
Doneto save the image if you like it. - Or press trash icon to delete if there is a wrong capture.
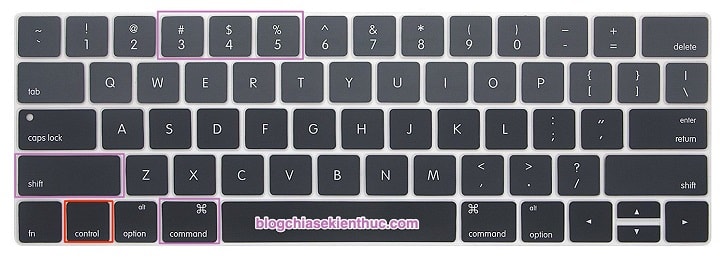
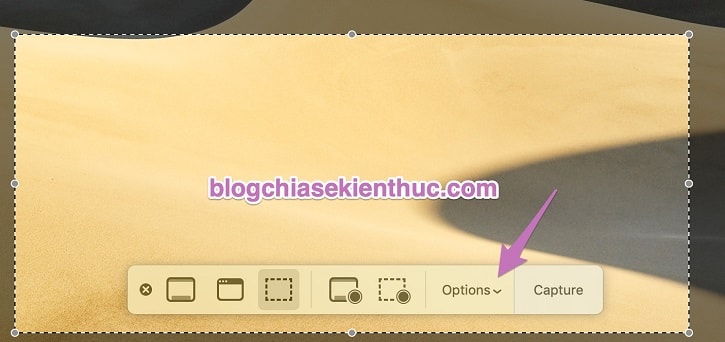
# 6. Take photos with many functions
This is nothing too special, it is a few types of shooting only but you can choose.
It's really easy to use: Use key combinations Command ⌘ + Shift ⇧ + 5 To open this menu => select shooting mode on the right => select the shooting area on the screen and finally press Capture to capture the selected area.
But what I want you to be interested in is the part Options its just 😀
# 7. Few small settings to use the macOS photography tool better
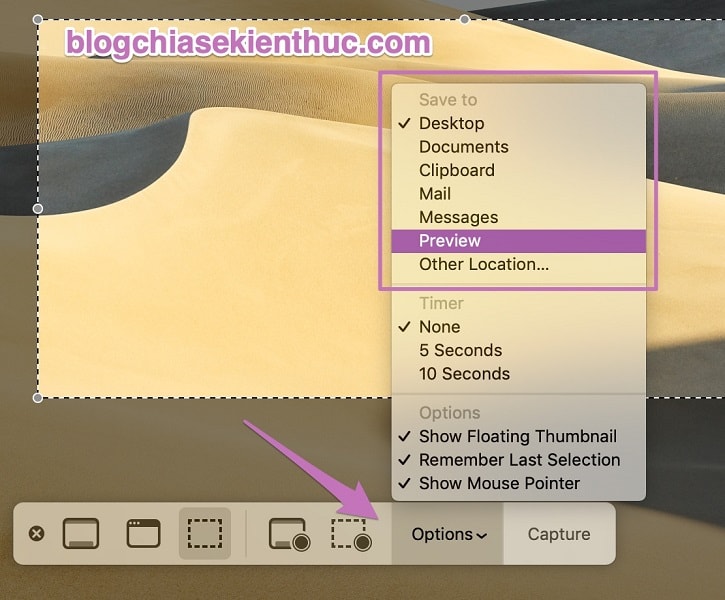
7.1. Change where photos are stored
By default, all your screenshots will be saved on the main screen, but if you're a neat person rather than a messy desktop, you should change the folder to save this image.
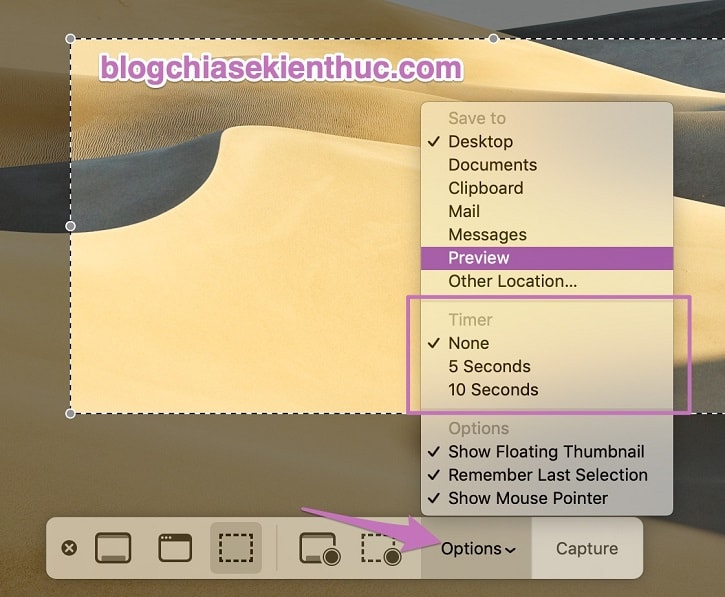
Perform: To change it, open the photo capture tool at # 6 up => then click Options.
At the top of the menu – Save to will be where we choose the default image storage folder.
You can save to existing mac directories like Preview, Documents, … or save to the prepared folder by clicking Other Location….
7.2. Schedule Mac screen capture time
By default, when you press the button to activate the capture feature, the image will be taken at that time.
However in some cases, we need a few seconds to prepare the capture content => this is the time of the feature Timer (timer capture time) take effect. To activate is also very simple:
Perform: You click on Options (see section # 6) => look down to the section Save To will see the line Timer with 2 options of 5 seconds and 10 seconds Delay.
Unfortunately, it does not allow us to set the time at will but I think that is also very OK.
7.3. Change the image format when saving
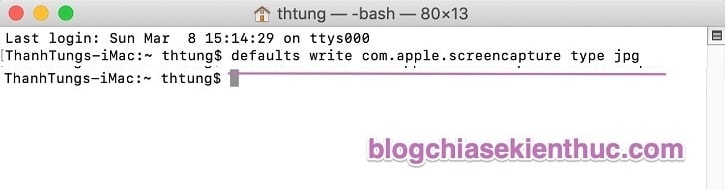
By default, all pictures taken will be saved in the format .PNG (Portable Network Graphics), but I'm used to the format JPG than.
If you want to convert the default image format from PNG to JPG just like me, do the following:
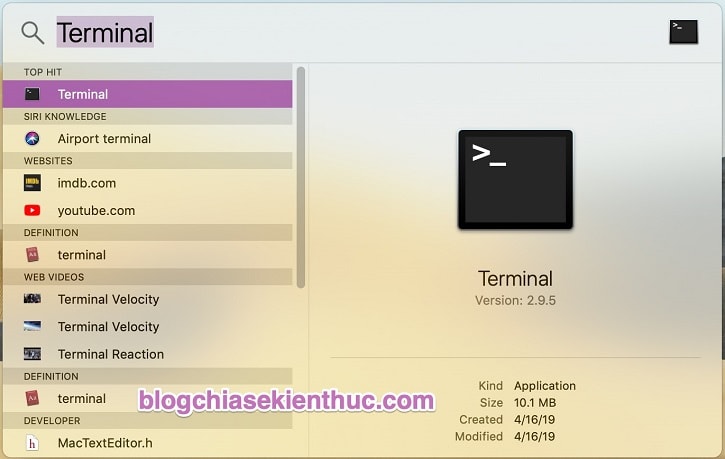
Perform: Open Terminal by entering a keyword Terminal Go to Search Spotlight => and press the key Enter.
Then, copy and paste the below command line into the Terminal window => then Enter is to be.
defaults write com.apple.screencapture type jpg
If you enter it correctly it will not show anything, remember to change JPG into one of the supported formats if you want: bmp, pdf, jpg, jp2, tif, pict, tga, png.
7.4. Change the default File name when taking photos
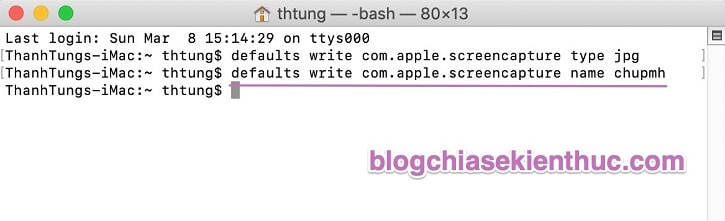
The default image file name when taken and saved will be in the form: Screenshot year-month-day at hour.min.sec.PNG.
If you don't like it, you can change the word Screenshot into another name. You can use the following command in Terminal, instead of text chupmh in the command below to the new File name you want.
defaults write com.apple.screencapture name chupmh
II. Epilogue
So I have just finished sharing for you how Use the screenshot tool on macOS A very detailed and easy to understand okay, after reading this article but you do not master this tool, it is a bit wasteful phí
Hopefully after this article you can easily get a desired screenshot without having to install any 3rd party software anymore. Good luck !
CTV: Nguyen Thanh Tung – Blogchiasekienthuc.com
Note: Was this article helpful to you? Do not forget to rate the article, like and share it with your friends and relatives!